In this tutorial, we will go over the basics of running and logging data to mlflow
Installation and Setup
mlflow is installed using pip and can be installed just by using
pip install mlflow
To start the mlflow server, we do
mlflow server \
  --backend-store-uri sqlite:///mlflow.db \
  --default-artifact-root ./artifacts \
  --host 0.0.0.0 \
  --port 5000
While running mlflow without running the server works fine and the previous step can be skipped, it then writes to the mlruns directory and stores data there and not in a database. If we wanted to move the data out somewhere else, moving from mlruns to a remote server is difficult.
In a production environment, the back-end store would be a production database and artifacts would be stored in an amazon s3 bucket or something compatible.
To make the experiments log to the local server, we need to add the following environment variable,
export MLFLOW_TRACKING_URI=http://localhost:5000
Basic workflow
If we are logging metrics over time, mlflow.log_metric is the main function that takes a step. All the other logging is for an experiment like hyper-parameters, artifacts etc.
Below is a concise sequence of MLflow API calls and their purpose when instrumenting your training (or any) script:
Set Your Experiment Context
mlflow.set_experiment(experiment_name)- Ensures metrics, parameters, and artifacts go under the named experiment. Creates it if it doesn’t exist.
Start a Run
with mlflow.start_run():- Opens a run context. All subsequent logs attach to this run. Optionally, pass
run_nameornested=True.
Log Parameters
mlflow.log_param(key, value)ormlflow.log_params(dict_of_params)- Records hyperparameters or configuration values once per run.
Log Metrics
mlflow.log_metric(key, value, step=None)- Records scalar values (loss, accuracy) over time. Use
stepto indicate ordering (e.g., epoch or iteration).
Log Tags (Optional)
mlflow.set_tag(key, value)ormlflow.set_tags(dict_of_tags)- Attaches arbitrary metadata (e.g., model type, dataset version) to runs.
Log Artifacts
mlflow.log_artifact(local_path, artifact_path=None)- Uploads files (plots, model weights, logs) to the artifact store under this run. Use
log_artifacts()to upload directories.
End the Run
- Exiting the
withblock automatically ends the run. - Or explicitly call
mlflow.end_run()if you started a run without the context manager.
- Exiting the
Retrieve and Compare
- Use the MLflow UI or
MlflowClientto fetch past runs, parameters, metrics, and artifacts for analysis or comparison.
- Use the MLflow UI or
That’s the core flow. By calling these functions in sequence—set_experiment → start_run → log_param(s) → log_metric(s) → log_artifact(s) → end—the MLflow backend captures everything for reporting and later retrieval.
Logging with MLFlow
MNIST Training code
The following is the basic training of MNIST data using pytorch.
import torch
import torch.nn as nn, torch.optim as optim
import torchvision
import torchvision.transforms as T

# Model definition
class SimpleMNIST(nn.Module):
    def __init__(self):
        super().__init__()
        self.net = nn.Sequential(
            nn.Flatten(),
            nn.Linear(28*28, 128),
            nn.ReLU(),
            nn.Linear(128, 10),
        )
    def forward(self, x):
        return self.net(x)

# Data loaders
transform = T.Compose([T.ToTensor(), T.Normalize((0.5,), (0.5,))])
train_loader = torch.utils.data.DataLoader(
    torchvision.datasets.MNIST(
        root='./data', train=True, download=True, transform=transform
    ), batch_size=64, shuffle=True
)
val_loader = torch.utils.data.DataLoader(
    torchvision.datasets.MNIST(
        root='./data', train=False, download=True, transform=transform
    ), batch_size=1000
)

# Hyperparameters
lr, epochs = 1e-3, 5

# Training loop
model = SimpleMNIST().to('cuda')
optimizer = optim.Adam(model.parameters(), lr=lr)
criterion = nn.CrossEntropyLoss()

for epoch in range(1, epochs+1):
    # Training
    model.train()
    train_loss = train_acc = 0
    for x, y in train_loader:
        x, y = x.cuda(), y.cuda()
        optimizer.zero_grad()
        logits = model(x)
        loss = criterion(logits, y)
        loss.backward(); optimizer.step()
        train_loss += loss.item() * x.size(0)
        train_acc += (logits.argmax(dim=1) == y).sum().item()
    train_loss /= len(train_loader.dataset)
    train_acc  /= len(train_loader.dataset)

    # Validation
    model.eval()
    val_loss = val_acc = 0
    with torch.no_grad():
        for x, y in val_loader:
            x, y = x.cuda(), y.cuda()
            logits = model(x)
            val_loss += criterion(logits, y).item() * x.size(0)
            val_acc  += (logits.argmax(dim=1) == y).sum().item()
    val_loss /= len(val_loader.dataset)
    val_acc  /= len(val_loader.dataset)

    print(f"Epoch {epoch}: train_loss={train_loss:.4f}, train_acc={train_acc:.4f},"
          f" val_loss={val_loss:.4f}, val_acc={val_acc:.4f}")
The output of the code is
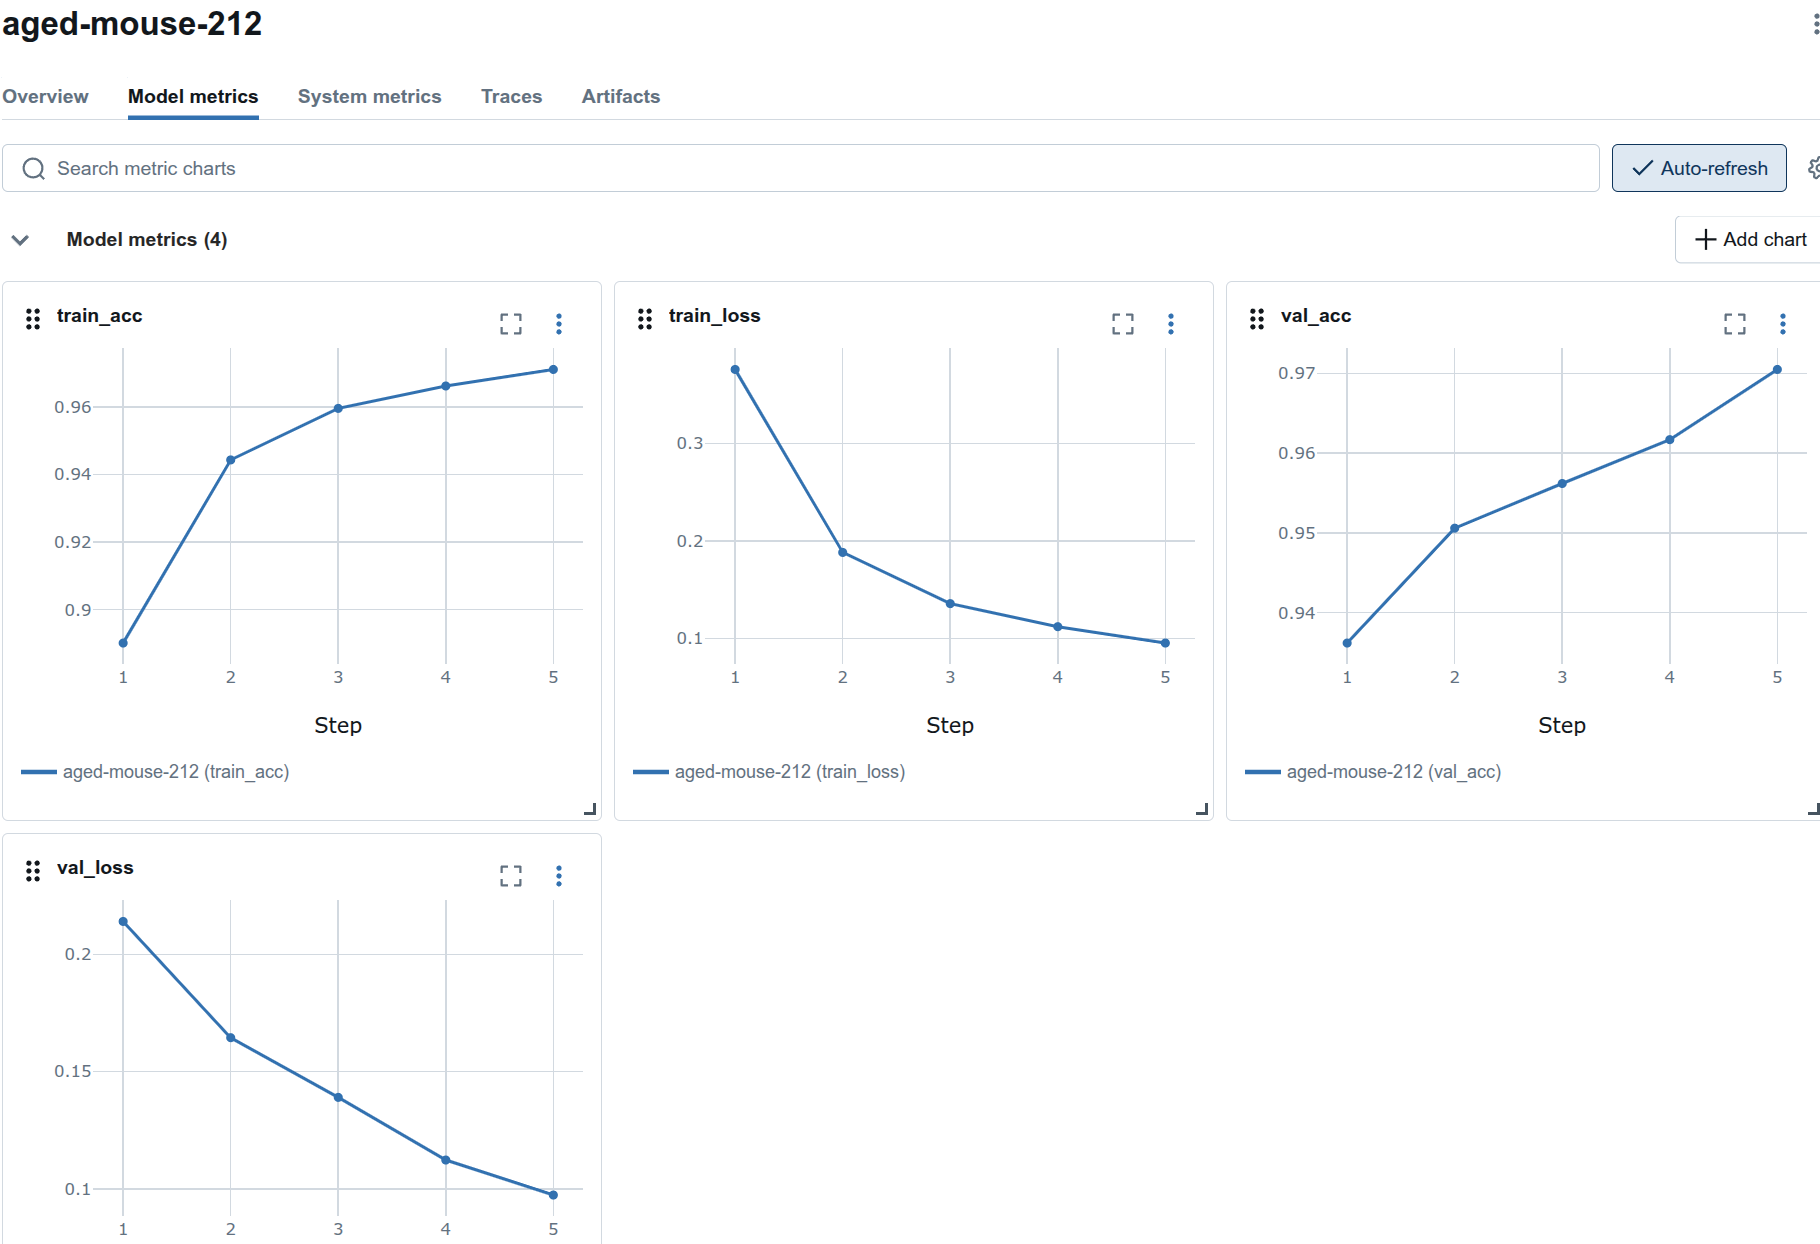
Epoch 1: train_loss=0.3862, train_acc=0.8872, val_loss=0.2547, val_acc=0.9208
Epoch 2: train_loss=0.2005, train_acc=0.9415, val_loss=0.1677, val_acc=0.9489
Epoch 3: train_loss=0.1507, train_acc=0.9553, val_loss=0.1288, val_acc=0.9625
Epoch 4: train_loss=0.1223, train_acc=0.9633, val_loss=0.1208, val_acc=0.9630
Epoch 5: train_loss=0.1009, train_acc=0.9693, val_loss=0.1075, val_acc=0.9677
Adding MLFlow logging
We can add MLFlow logging to the code above. We log the hyperparameters, metrics and finally the model as well.
import torch
import torch.nn as nn, torch.optim as optim
import torchvision
import torchvision.transforms as T
import mlflow

# Model definition
def SimpleMNIST(nn.Module):
    def __init__(self):
        super().__init__()
        self.net = nn.Sequential(
            nn.Flatten(),
            nn.Linear(28*28, 128),
            nn.ReLU(),
            nn.Linear(128, 10),
        )
    def forward(self, x):
        return self.net(x)

# Data loaders
transform = T.Compose([T.ToTensor(), T.Normalize((0.5,), (0.5,))])
train_loader = torch.utils.data.DataLoader(
    torchvision.datasets.MNIST(
        root='./data', train=True, download=True, transform=transform
    ), batch_size=64, shuffle=True
)
val_loader = torch.utils.data.DataLoader(
    torchvision.datasets.MNIST(
        root='./data', train=False, download=True, transform=transform
    ), batch_size=1000
)

# Hyperparameters
params = {"lr": 1e-3, "batch_size": 64, "epochs": 5}

# MLflow instrumentation
mlflow.set_experiment("MNIST_experiment")
with mlflow.start_run():
    mlflow.log_params(params)

    model = SimpleMNIST().to('cuda')
    optimizer = optim.Adam(model.parameters(), lr=params["lr"])
    criterion = nn.CrossEntropyLoss()

    for epoch in range(1, params["epochs"]+1):
        # Training
        model.train()
        train_loss = train_acc = 0
        for x, y in train_loader:
            x, y = x.cuda(), y.cuda()
            optimizer.zero_grad()
            logits = model(x)
            loss = criterion(logits, y)
            loss.backward(); optimizer.step()
            train_loss += loss.item() * x.size(0)
            train_acc += (logits.argmax(dim=1) == y).sum().item()
        train_loss /= len(train_loader.dataset)
        train_acc  /= len(train_loader.dataset)

        # Validation
        model.eval()
        val_loss = val_acc = 0
        with torch.no_grad():
            for x, y in val_loader:
                x, y = x.cuda(), y.cuda()
                logits = model(x)
                val_loss += criterion(logits, y).item() * x.size(0)
                val_acc  += (logits.argmax(dim=1) == y).sum().item()
        val_loss /= len(val_loader.dataset)
        val_acc  /= len(val_loader.dataset)

        # Log metrics
        mlflow.log_metric("train_loss", train_loss, step=epoch)
        mlflow.log_metric("train_acc",  train_acc,  step=epoch)
        mlflow.log_metric("val_loss",   val_loss,   step=epoch)
        mlflow.log_metric("val_acc",    val_acc,    step=epoch)

        print(f"Epoch {epoch}: train_loss={train_loss:.4f}, train_acc={train_acc:.4f},"
              f" val_loss={val_loss:.4f}, val_acc={val_acc:.4f}")

    # Log model artifact
    torch.save(model.state_dict(), "model.pth")
    mlflow.log_artifact("model.pth")
Results
When going to the address http://127.0.0.1:5000/, we should see the web interface. The experiment is the name that we gave MNIST_experiment and each run is given a random name aged-mouse-212.
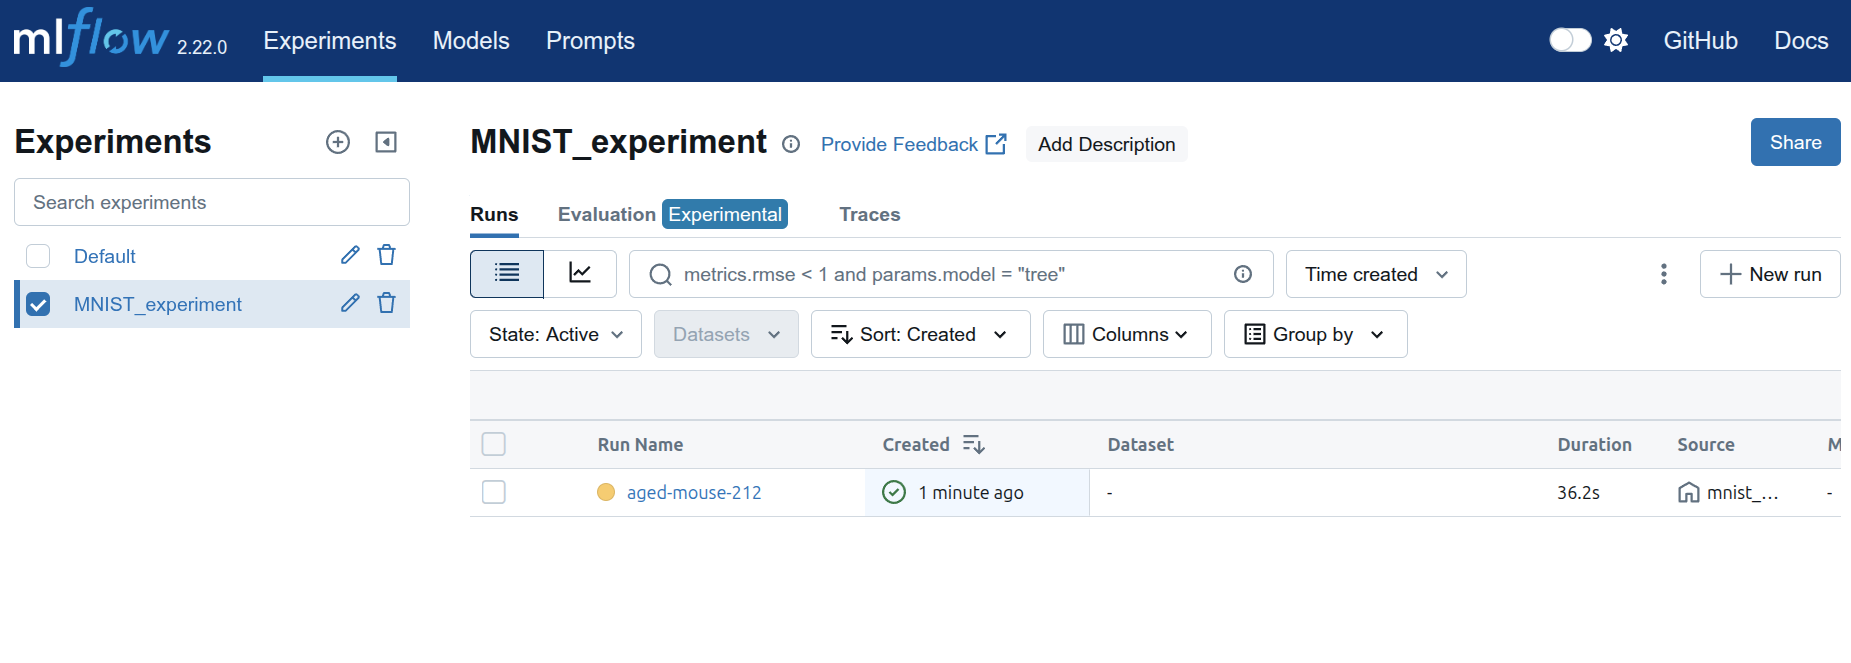
If we click on the run, we get the parameters and information about the run.

Model-metrics tab has the graphs of the runs.
The model is logged and shows up in the artifacts tab.

The model.pth is also stored in the local artifacts directory.
$ tree artifacts/
artifacts/
└── 1
    └── 11e29ac1517e425ba546e4bb29790b35
        └── artifacts
            └── model.pth

4 directories, 1 file
Downloading models
If we want to download the model from MLFlow and then run inference, the following code is the method to do so. We download the model and then use it to do inference. Note that the environment variable MLFLOW_TRACKING_URI is used to find the server.
It is using the first run and if we have a specific run we want to use, it can be adjusted.
import os
import random

import torch
import torch.nn as nn
import torchvision
import torchvision.transforms as T
from mlflow.tracking import MlflowClient

# 1. Define the same model class
class SimpleMNIST(nn.Module):
    def __init__(self):
        super().__init__()
        self.net = nn.Sequential(
            nn.Flatten(),
            nn.Linear(28*28, 128),
            nn.ReLU(),
            nn.Linear(128, 10),
        )
    def forward(self, x):
        return self.net(x)

# 2. Connect to MLflow and find your run by experiment name
client = MlflowClient()  # adjust URI if needed

# Get experiment by name instead of ID
experiment_name = "MNIST_experiment"
experiment = client.get_experiment_by_name(experiment_name)

if experiment is None:
    raise ValueError(f"Experiment '{experiment_name}' not found!")

experiment_id = experiment.experiment_id
print(f"Found experiment '{experiment_name}' with ID: {experiment_id}")

# List runs in your experiment using the experiment ID
runs = client.search_runs(experiment_ids=[experiment_id], order_by=["attributes.start_time DESC"], max_results=1)
run = runs[0]
run_id = run.info.run_id
print(f"Using run_id: {run_id}")

# 3. Download the checkpoint artifact
local_dir = "./downloaded_ckpt"
os.makedirs(local_dir, exist_ok=True)
model_path = client.download_artifacts(run_id, "model.pth", local_dir)
print(f"Checkpoint downloaded to: {model_path}")

# 4. Instantiate and load weights
device = torch.device("cuda" if torch.cuda.is_available() else "cpu")
model = SimpleMNIST().to(device)
state_dict = torch.load(model_path, map_location=device)
model.load_state_dict(state_dict)
model.eval()

# 5. Prepare a few random MNIST samples
transform = T.Compose([T.ToTensor(), T.Normalize((0.5,), (0.5,))])
mnist = torchvision.datasets.MNIST(root="./data", train=False, download=True, transform=transform)
indices = random.sample(range(len(mnist)), 5)

# 6. Run inference
for idx in indices:
    img, label = mnist[idx]
    img_batch = img.unsqueeze(0).to(device)         # add batch dim
    with torch.no_grad():
        logits = model(img_batch)
        pred = logits.argmax(dim=1).item()
    print(f"Sample {idx:4d} — true label: {label}  |  predicted: {pred}")
Conclusion
The code is given in the repository here.
This is a brief tutorial on how to use MLFlow to log parameters, metrics and model and then get the model to run inference.